About Creator +
Brightspace Creator+ is a content-authoring package that allows users to create highly desirable, engaging, and delightful experiences in minutes. With easy-to-use tools and leveraging existing workflows, creators can build dynamic content and media experiences that appeal to the love of learning, improve comprehension, and achieve high engagement for instructors and learners.
Creator+ offers the following main tools for content creators to enhance their course content:
- Element & Layouts enables users to quickly and seamlessly create dynamic content and chunk concepts following instructional design best practices.
- Practices to deepen comprehension and reinforce concepts using formative practice questions in Content HTML topics.
Using Creator +
The Creator+ package extends the Brightspace Editor with additional features to help you create more dynamic, customized content. In addition to all the basic Brightspace Editor features, these Creator+ features make it easier for non-technical users to customize content to meet their needs. The Brightspace Editor Insert Element and Practices support using the HTML file language attribute to build content in your learners' language. The language setting you set appears in content and on buttons to expand content, viewing solutions and scores on Practices, and ARIA labels.
About Insert Element
The Creator+ Insert Element tool allows content creators to add dynamic components with a user-friendly authoring experience that does not require HTML coding knowledge or experience.
To use the Insert Element features
- In content, create a new topic or open an existing one.
- Click the Creator+ Authoring Tools menu
 in the Brightspace Editor.
 - Select Insert Element from the menu.
- Select the element you want to create from the available list, and then complete the fields to configure the element, as follows:
- Select Accordion. Select one of the Format Options to indicate if you want to number the accordian folders. Enter Learner Instructions to ensure that the learners know there is a dynamic element. Enter the Accordion Tab Title and Accordion Content of the first accordion tab. If you have more accordions to add, add the content as appropriate. Click Add Accordion Item if you need more accordions.
- Select Tabs. Select one of the Format Options to indicate if you want the tabs to be horizontal or vertical. Enter Learner Instructions to ensure that the learners know there is a dynamic element. Enter the Tab Title and Tab Content of the first tab. If you have more tabs to add, add the content as appropriate. Click Add Tab Item if you need more tabs.
- Select Click and Reveal. Select one of the Format Options to indicate if you want the click trigger to have a question mark icon (Question) or text only (No Icon). Add Introductory Content to introduce the element. Enter Learner Instructions to ensure that the learners know there is a dynamic element. Enter the Button Label and Revealed Content. If you have more Click and Reveal elements to add, click Back and add another element.
- Select Callout. Select one of the Format Options. For more information about each, click the question mark icon beside the option title. Enter a Title and Callout Content for your element. If you have more Callout elements to add, click Back and add another element.
- Select Timeline. Select one of the Format Options to indicate if you want the timeline to have left-aligned or alternating entries. Enter the first Timeline Panel Title and Timeline Panel Text. If you have more entries to add to the timeline, add the content as appropriate. Click Add Item if you need more timeline panels.
- Select Stylized quote. Select one of the Format Options to indicate if you want standard-size text or large focus. Enter the Quotation and Attribution.
- Select Flip cards. Enter Learner Instructions to ensure that the learners know there is a dynamic element. On the Front tab, enter the Title. If you want to include an image on the front of your flip card, click Add Image. Select an image file and add Alternative Text or indicate that the image is decorative. Then, click Save. Enter the content you want to include on the front of the image. It is recommended that you include no more than 4 words or 25 characters. Repeat the process on the Back tab to configure the back of your flip card. If you want to add another flip card to the same row, click Add item to the right of the current flip card. If you want to add a flip card on a different row, click Add Row.
- Select Carousel. Enter Learner Instructions to ensure that the learners know there is a dynamic element. Click Add Image, Add Title, or Add Text to configure your first carousel slide. If you have more entries to add to the carousel, add the content as appropriate. Click Add Slide if you need more carousel slides.
- When you are finished configuring each element, click Preview, and when you are satisfied with the element, click Insert.
To edit an inserted element
- In Brightspace Editor, select the element you have added.
- Click Edit using the icon at the top of the element to open the editing interface. You can also move the object up or down to change the order or delete the object from this panel.
Note: If your element object is the top object on the page, the edit panel appears at the bottom of the object.
Note: You can edit some aspects of the elements using the code editor; however, it is not possible to directly edit inserted elements outside the edit workflow in the WYSIWYG interface. You must launch the Insert Element edit workflow.
Create accessible Hotspots with Hotspot Element
Hotspots provide a multilayer learning experience enriched with multimedia and interactive components that promote exploration, analysis, and evaluation. Learners can select and open active icons to learn more about the parts of an image. An invisible grid overlay allows the image to be fully accessible by integrating micro alt tags.
To add hotspot markers to images
- In Brightspace Editor, select Create + Authoring Tools> Insert Element.

Figure: The Creator + Authoring Tools drop-down menu showing the Insert Element option.
- In the Insert Element dialog, click Hotspot.
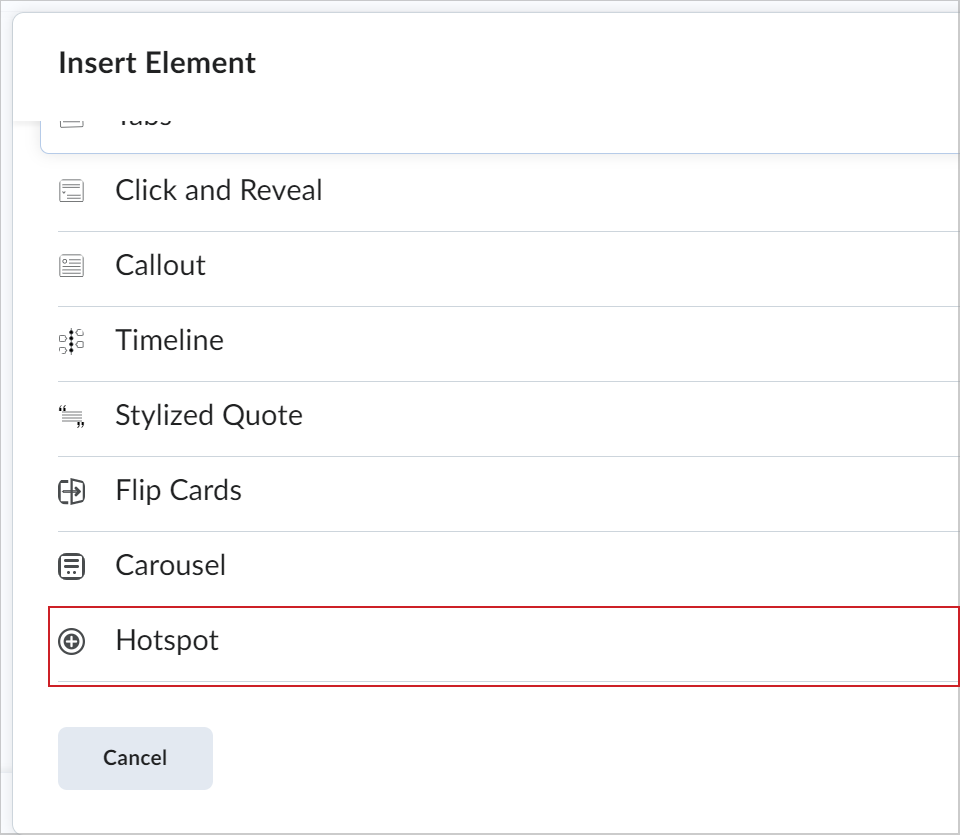
Figure: The Insert Element dialog showing the Hotspot option.
- Choose to keep the default Learner Instructions or add custom Learner Instructions.
- Click Add Image and select an image from your personal device. Enter alt text in the Alternative Text field.
- Click Save.

Figure: The Insert Element dialog showing the Learner Instructions field and the Add Image button.
- Click anywhere on the image to place a hotspot marker. The interface to build content associated with the hotspot appears to the right of the image.
- In the right panel, select a hotspot to edit or add content. Each hotspot is labeled in the order in which you placed the marker.
- You can rename the hotspot. Hotspot names are used for editing and screen reader users.
- In the Hotspot Content field, use the full HTML editor to add a description or more information, additional images, videos, and links to additional resources.
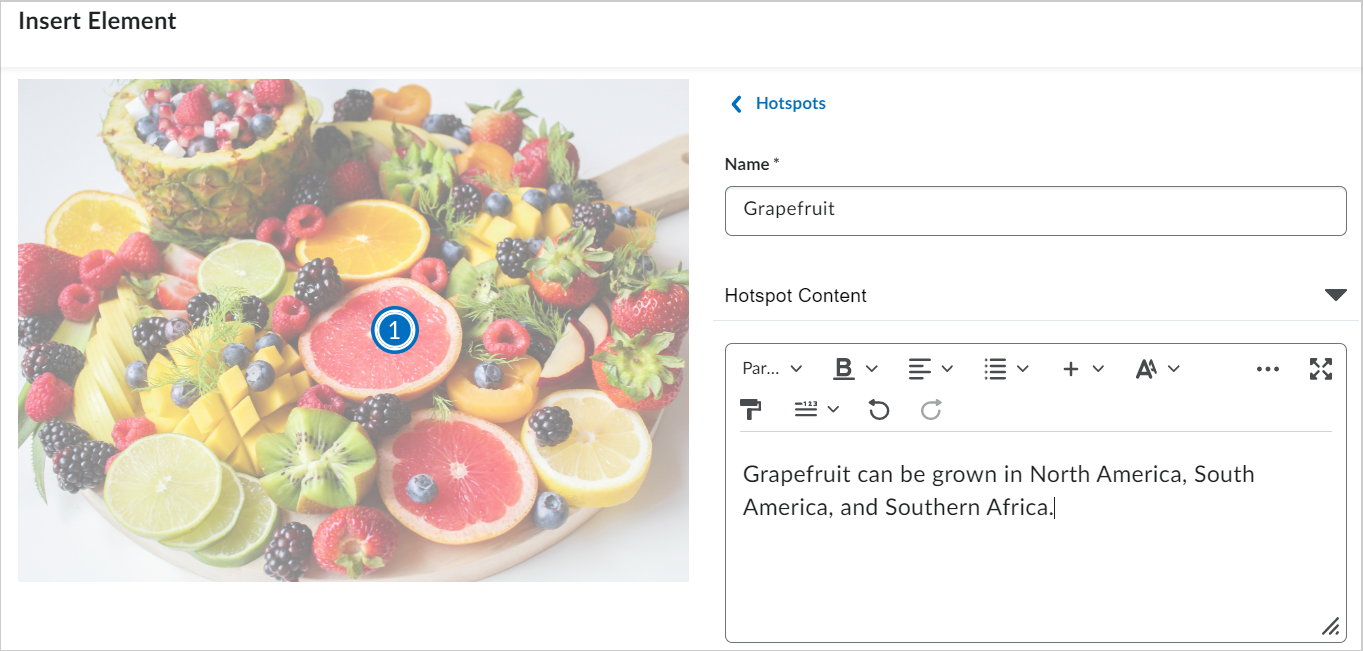
Figure: Entering a name and text for a hotspot.
- Click Hotspot Marker to change the icon and color of a hotspot marker.
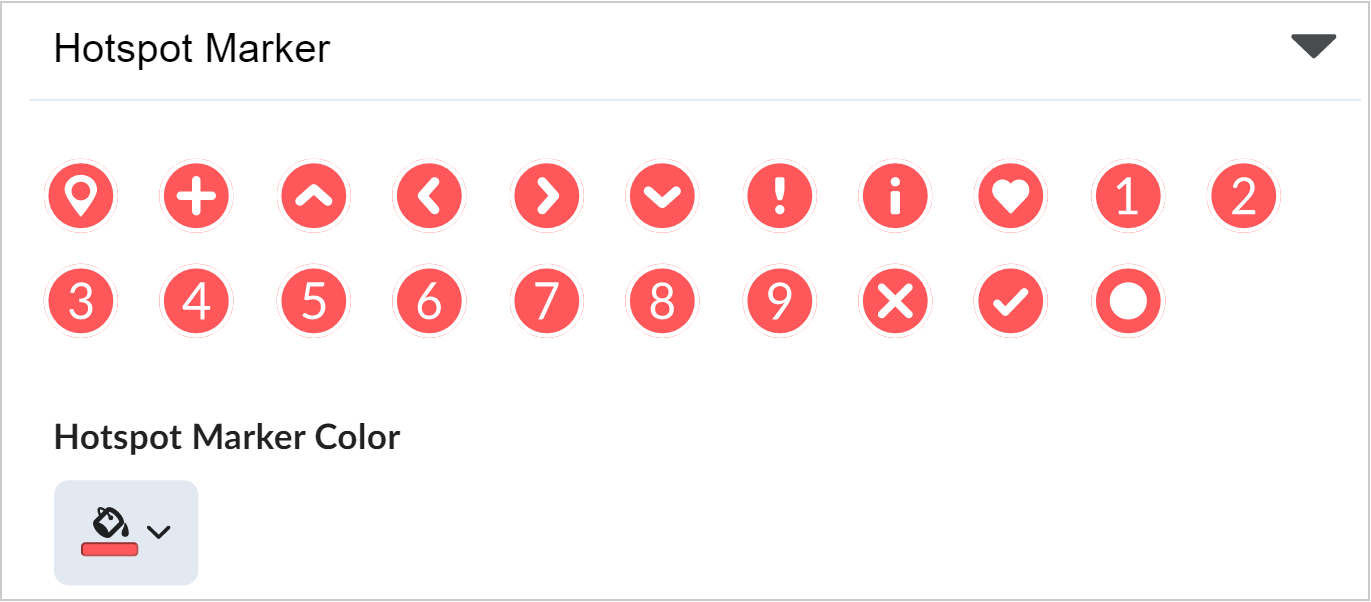
Figure: Editing the style and color for a hotspot marker.
- Select Hotspots to return to the hotspot selection option. Repeat steps 6-10 for all hotspots.
Note: You can insert up to nine hotspot markers for an image.
- After adding all your hotspot markers, below Learner Instructions, click Accessibility.
- Under the Accessibility heading, select one of the following:
- Accessible hotspots only: Lets you add a micro alt tag for each hotspot to describe the part of the image associated with the hotspot. This is an ideal option when the position of the hotspot within the image or the contextual details of the image are not relevant to the learning.
- Fully accessible image: Lets you split the image into a grid, allowing you to add a micro alt tag for each grid cell to describe all parts of the image. This is an ideal option when the position of the hotspot within the image or the contextual details of the image will inform the learning.
- Add micro alt tags as required based on your Accessibility selection.
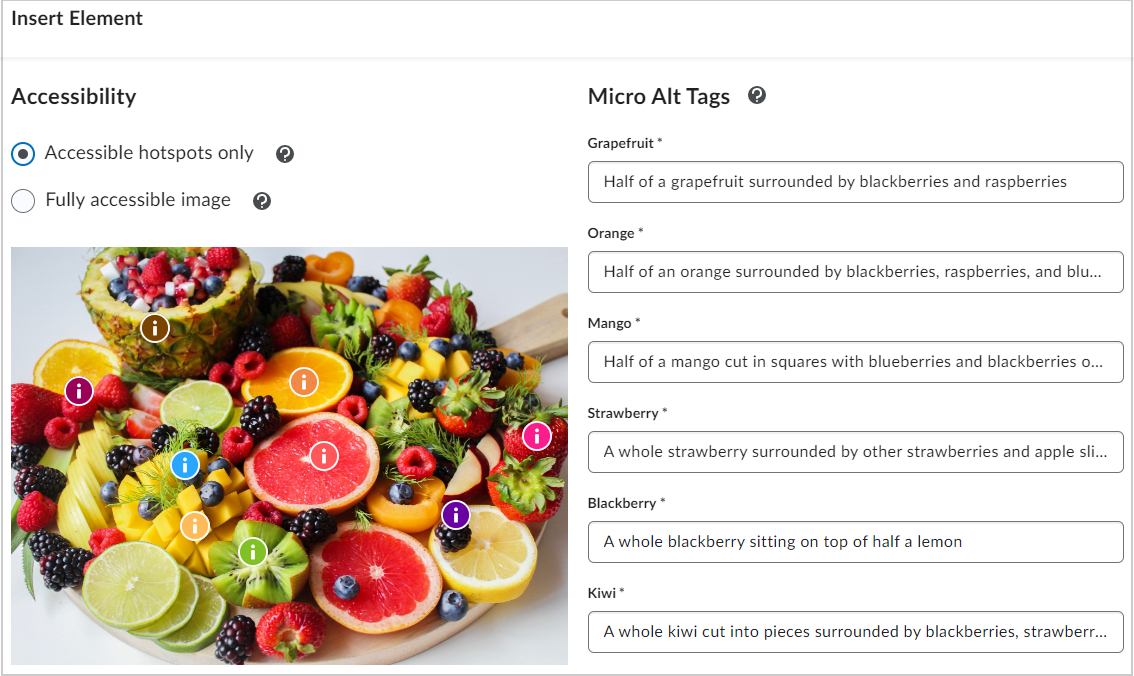
Figure: The Micro Alt Tags fields for all hotspot markers.
- Click Save and Insert to add the Hotspot to the Content page.
- Click Save and Close.
You have created a Hotspot Element.
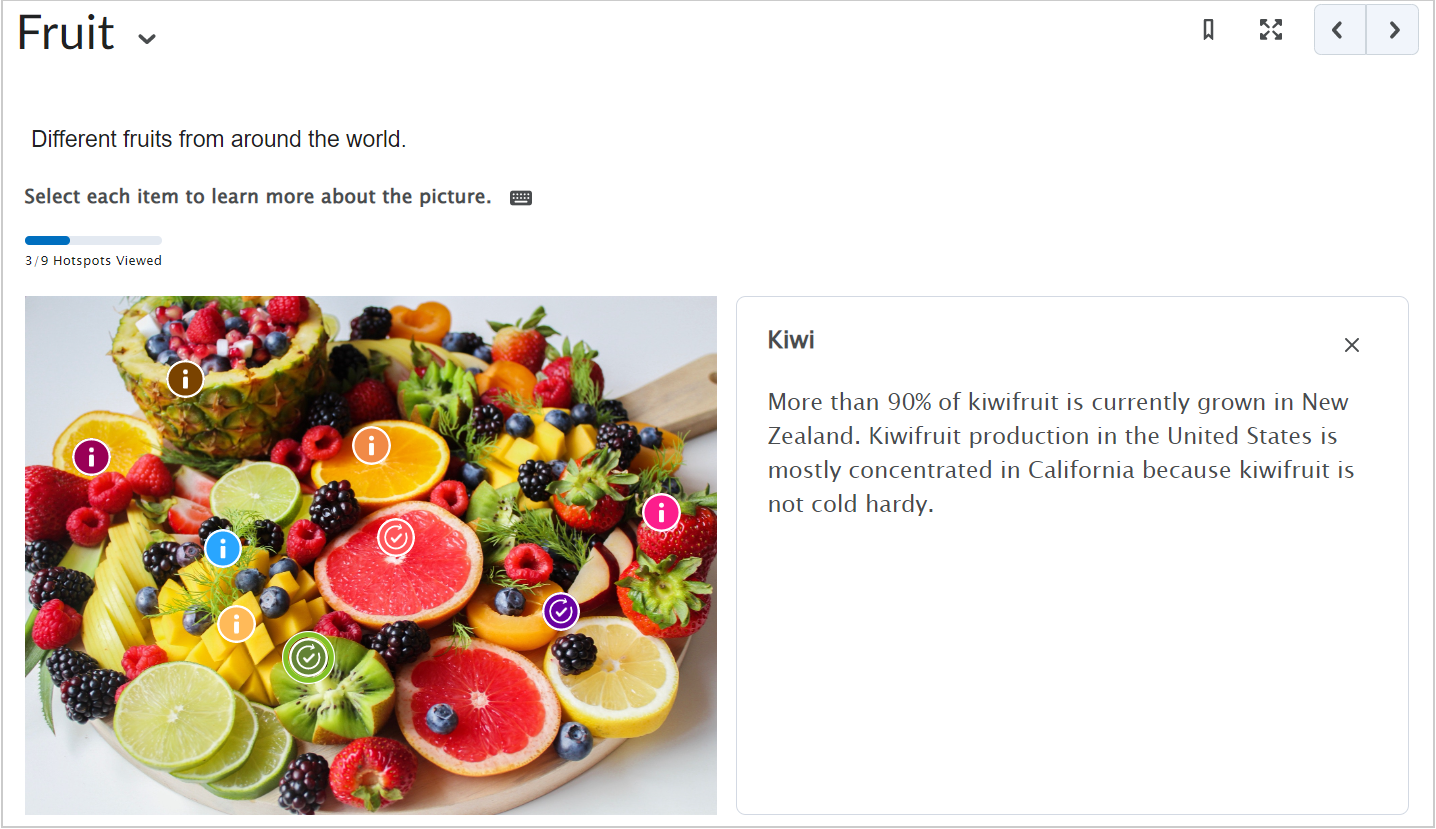
Figure: How an image with hotspots appears in content.
Video: Create content with the Hotspot Element
Insert Practices
Creator+ Insert Practices empowers you to create formative and interactive learning activities to let learners test their comprehension and get immediate feedback on their understanding of a topic outside of a formal assessment.
Insert Practice appears in the Creator+ Authoring Tools menu of the Brightspace Editor:

Figure: The location of the Insert Practice option under the Creator+ Authoring Tools button.
Users can select a type of Practice from a menu, including:
- Fill in the blanks (Drop-down selections or typed response)
- Multi-Select
- Multiple Choice
- Sequencing
- Sorting
- True or False
Each practice has its own workflow to complete the required information, and a preview accompanies the build so that course creators can observe how learners will experience the created practice. A preview accompanies the build so that course creators can observe how learners will experience the created practice.
Note: Practice scores are not saved or tracked; they are only intended to provide the learner with immediate feedback.
Add a Drop-down Fill in the Blanks practice
- In the Content tool, click to open Brightspace Editor in a new or existing content topic.
- From the Brightspace Editor navbar, click Creator+ Authoring Tools > Insert Practice.
- Click Dropdown Fill in the Blank.
- Add a Title, Short Description, and Instructions.
Note: The Short Description field is visible only to Content Editors when editing the Content Topic.
- Add your Question Text. To create a blank space, type the word 'blank' and a number inside double square brackets, for example, [[blank1]].
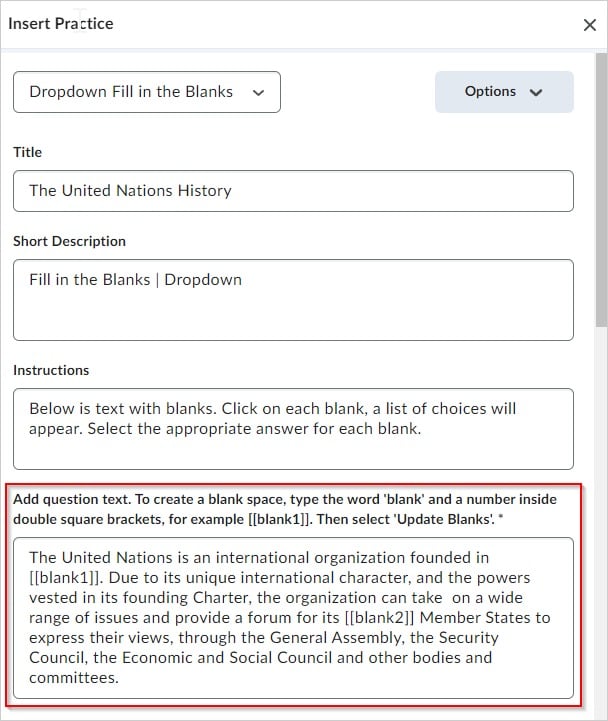
Figure: An example of question text with blanks.
- Click Update Blanks.
- Add the Correct Answer and at least one Incorrect Answer for each blank space. Use Add Incorrect Answer to add additional incorrect answers. To delete an answer, click the Trashcan icon.
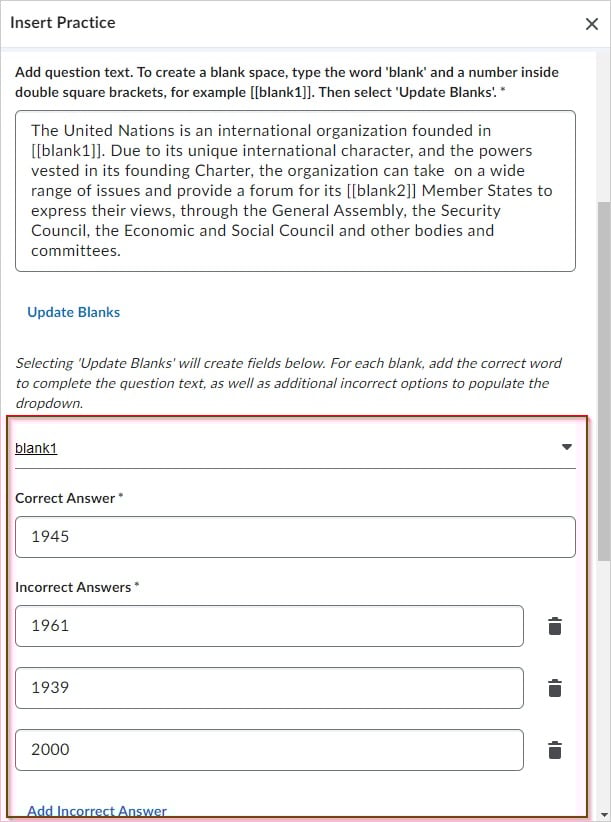
Figure: An example of correct and incorrect answers.
- In the How will this practice be scored? field, choose one of the following options:
- All or Nothing (default)
- Correct Selections
A preview of the practice appears to the right of the interface. You can check the answers by clicking the corresponding button.
- To view the practice as a user would see it, click Preview.
- Click Insert once you have completed the practice.
- Click the X button to close the Practice interface.
- To edit the Practice, select the Dropdown Fill in the Blank practice and select Edit. You can also use this panel to delete or move the practice.
Add a Multi-Select practice
- In the Content tool, click to open Brightspace Editor in a new or existing content topic.
- From the Brightspace Editor navbar, click Creator+ Authoring Tools > Insert Practice.
- Click Multi-Select practice.
- Add a Title, Short Description, and Instructions. Note: The Short Description field is visible only to Content Editors when editing the Content Topic.
- Add your Question Text. To add an image to your question, click Add Image > Choose File; navigate to the image location and select it.
- To provide information for those with visual impairments, enter it into the Alternative Text field.
- Click the This Image is Decorative check box if the image does not convey any information needed to complete the question.
- Click Save.
- Add Answers. Use the Add Answer link to add more answers. To delete an answer, click the Trashcan icon. If needed, add an image to your answer by clicking Add Image > Choose File. Then, navigate to the image on your computer and select it.
- Add Alternative text to an image to provide information for those with visual impairments by entering it into the Alternative Text field.
- Click the This Image is Decorative check box if the image does not convey information.
- Click Save.
- Select all correct answers.
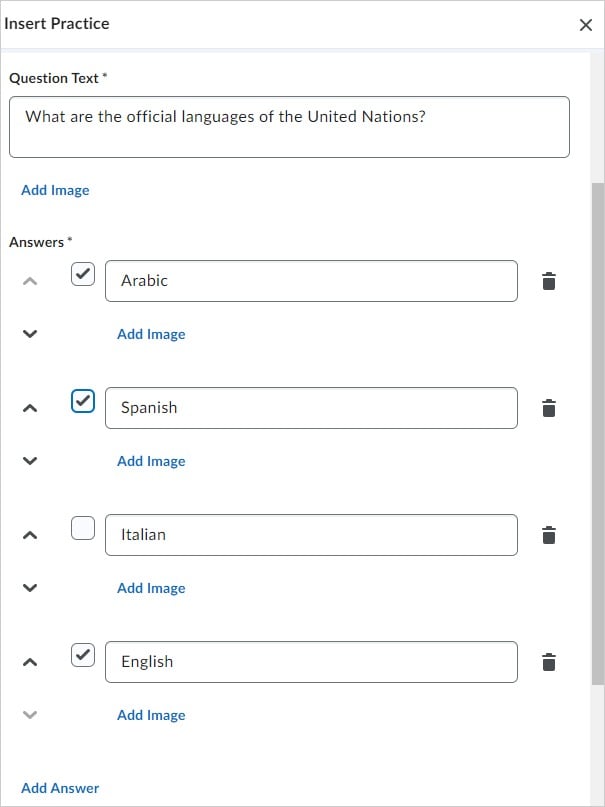
Figure: An example of selected correct answers for the Multi-Select practice.
- To randomize the answer order, select Randomize answer order.
- In the field How will this practice be scored?, choose one of the following options:
- All or Nothing (default)
- Right Minus Wrong Selection
A preview of the practice appears to the right of the interface. You can check the answers by clicking the corresponding button.
- To view the practice as a user would see it, click Preview.
- Click Insert once you have completed the practice.
- Click the X button to close the Practice interface.
- To edit the Practice, select Multi-Select practice and click Edit. You can also use this panel to delete or move the practice.
Add a Multiple Choice practice
- In the Content tool, click to open Brightspace Editor in a new or existing content topic.
- From the editor navbar, click Creator+ Authoring Tools > Insert Practice.
- Click Multiple Choice practice.
- Add a Title, Short Description, and Instructions.
Note: The Short Description field is visible only to Content Editors when editing the Content Topic.
- Add your Question Text. To add an image to your question, click Add Image > Choose File, then navigate to the image location and select it.
- To provide information for those with visual impairments, enter it into the Alternative Text field.
- Click the This Image is Decorative check box if the image does not convey any information needed to complete the question.
- Click Save.
- Add Answers. Click the Add Answer link to add additional answers. To delete an answer, click the Trashcan icon. To add an image to your answer, click Add Image > Choose File. Then, navigate to the image location and select it.
- To provide information for those with visual impairments, enter it into the Alternative Text field.
- Click the This Image is Decorative check box if the image does not convey any information needed to represent the answer.
- Click Save.
- Select the correct answer. You can select only one correct answer for each question.
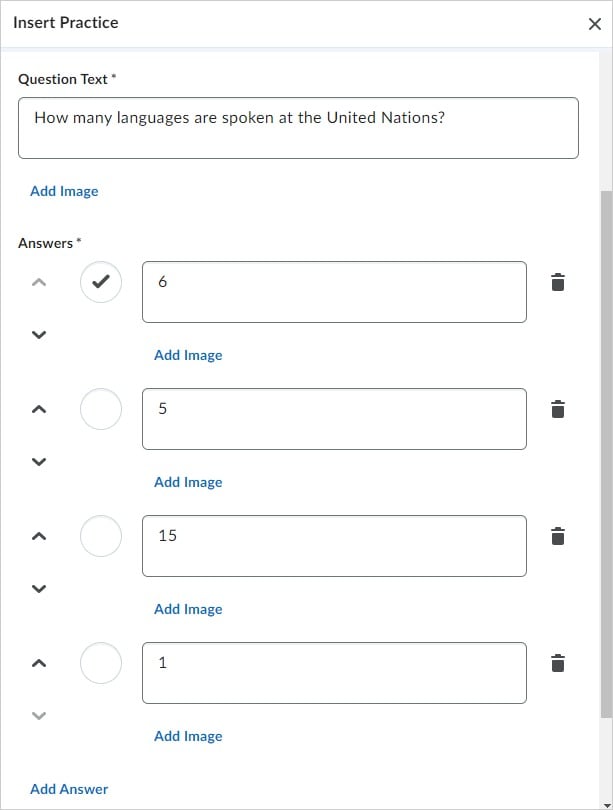
Figure: An example of a selected correct answer for the Multiple Choice practice.
- To randomize the answer order, select Randomize answer order.
A preview of the practice appears to the right of the interface. You can check the answers by clicking the corresponding button. - To view the practice as a user would see it, click Preview.
- Click Insert once you have completed the practice.
- Click the X button to close the Practice interface.
- To edit the Practice, select Multiple Choice practice and click Edit. You can also use this panel to delete or move the practice.
Add a Sorting Practice
- In the Content tool, click to open Brightspace Editor in a new or existing content topic.
- From the editor navbar, click Creator+ Authoring Tools > Insert Practice.
- Click Sorting.
- Add a Title, Short Description, and Instructions. Note: The Short Description field is visible only to Content Editors when editing the Content Topic.
- To indicate the total number of items in each category, click the Display Item Count per Category check box.
- For each category, add a Category Label. Additionally, you have the following options:
- There are four categories by default.
- Use the arrow buttons to rearrange the order of categories.
- To delete a category, click the Trashcan icon.
- To add an image to a category, click Add Image > Choose File, then navigate to the image location and select it.
- To provide information for those with visual impairments, enter it into the Alternative Text field.
- Click the This Image is Decorative check box if the image does not convey any information required to understand the category.
- Click Save.
- To add sortable items to a category, click the Category box and then enter the item's name. Additionally, you have the following options:
- Each category has one sortable item by default.
- To delete a sortable item, click the trash can icon.
- To add additional sortable items to the category, click Add Sortable Item.
- To add an image to a sortable item, Click Add Image > Choose File; then navigate to the image location and select it.
- To provide information for those with visual impairments, enter it into the Alternative Text field.
- Click the This Image is Decorative check box if the image does not convey information.
- Click Save.
A preview of the practice appears to the right of the interface.
- To view the practice as a user would see it, click Preview.
- Click Insert once you have completed the practice.
- Click the X button to close the Practice interface.
- To edit the Practice, select the Sorting practice and click Edit. You can also use this panel to delete or move the practice.
Add a Sequencing Practice
- In the Content tool, click to open Brightspace Editor in a new or existing content topic.
- From the Brightspace Editor navbar, click Creator+ Authoring Tools > Insert Practice.
- Click Sequencing.
- Add a Title, Short Description, and Instructions.
Note: The Short Description field is visible only to Content Editors when editing the Content Topic.
- To have the sequence numbered, click the Display Numeric Sequence check box.
- Add a Sequence Step and Sequenceable Item for each Sequence Step. Additionally, you have the following options:
- There are four Sequence Steps by default.
- To delete a Sequence Step, click the Trashcan icon.
- To add additional Sequence Steps, click Add Sequence Step.
- To add an image to a Sequence Step or Sequenceable Item, click Add Image > Choose File. Then, navigate to the image location and select it.
- To provide information for those with visual impairments, enter it into the Alternative Text field.
- Click the This Image is Decorative check box if the image does not convey information.
- Click Save.
A preview of the practice appears to the right of the interface.
- To view the practice as a user would see it, click Preview.
- Click Insert once you have completed the practice.
- Click the X button to close the Practice interface.
- To edit the Practice, select the Sequencing practice and click Edit. You can also use this panel to delete or move the practice.
Add a True or False practice
- In the Content tool, click to open Brightspace Editor in a new or existing content topic.
- From the Brightspace Editor navbar, click Creator+ Authoring Tools > Insert Practice.
- Click True or False.
- Add a Title, Short Description, and Instructions.
Note: The Short Description field is visible only to Content Editors when editing the Content Topic.
- In the Question Text field, add your statement.
- In Answers, select if each part of the statement is true or false.
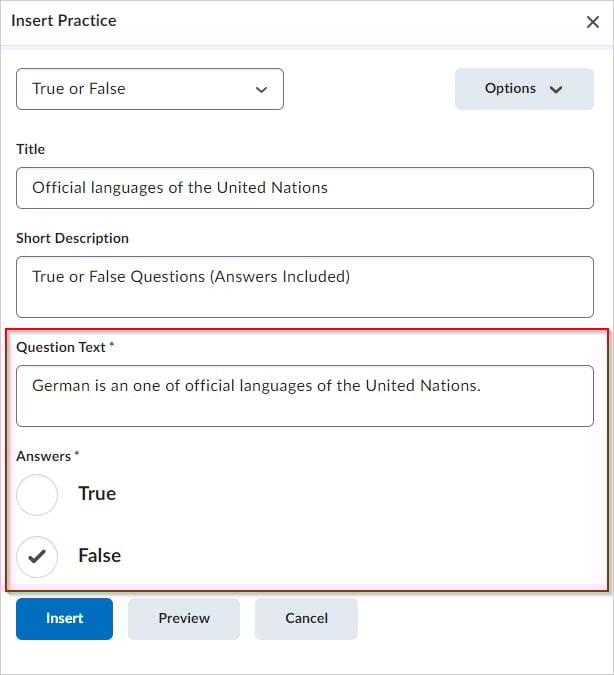
Figure: An example of a false statement for the True or False practice.
A preview of the practice appears to the right of the interface.
- To view the practice as a user would see it, click Preview.
- Click Insert once you have completed the practice.
- Click the X button to close the Practice interface.
- To edit the Practice, select the True or False practice and click Edit. You can also use this panel to delete or move the practice.
Edit a Practice
- In the Brightspace Editor, select the practice you have added while editing a Content HTML page.
- Click Edit using the icon at the top of the element to open the editing interface. You can also move the object up or down to change the order or delete the object from this panel.
Structure content with the Layouts tool
Use the Layouts tool to create panels that add structure and help organize your course content. Layouts can be used with any element a part of Insert Element.
Note: You must enable the Layouts tool in Org Tools.
To add a Layout to an HTML Content page
-
Within any tool that uses Brightspace Editor, place your text cursor in the editor in the position you would like to place your layout.
- Select Creator+ Authoring Tools > Layouts.

Figure: Click the Layouts tool in the Creator + Authoring Tools menu.
- In the Format Options section, select one of the following layout options:
- Two Panels
- Two Thirds / One Third Panels
- One Third / Two Thirds Panels
- Three Panels
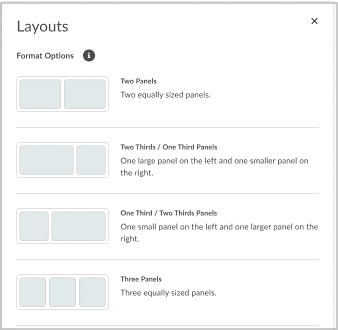
Figure: Select a layout panel type in the Format Options section.
You can now begin creating content in your layout. Select a panel to begin adding content using tools from Brightspace Editor.
To modify a layout
- In Brightspace Editor, select the layout to prompt the context menu.
- From the context menu, you can move the layout position up or down within the page using the arrows.
- Change the layout format by selecting another panel type.
- Use Delete to delete the layout and all content within the layout.
- Use Remove Layout to remove the layout panels, but keep the existing content.

Figure: Click your current layout panel to open the context menu.
You have changed the layout panel type.